This week we're sticking with DADGAD and looking at the idea of self accompanied guitar playing for a slightly different point of view... two-handed tapping! While tapping is a technique often associated with metal and shred playing, because it lends itself really well to high speeds, it's also a really nice way to add in notes that the left hand can't usually reach. We explore this in the lesson.
Independent Hands
Usually we rely on having our left and right hands synced up - ie your left hand moves to the fret and at exactly the same time your right hand picks the string. For this technique we actually need to have the hands operating independently of each other, much more like a piano player would. The best way to achieve this is to practice each hand separately.
Left Hand
We start off with the left hand, as that’s likely to be the most familiar part, since it’s no different to playing traditionally. We’re making sure to only use hammer ons and pull offs to play the notes. We can’t pick the strings as the right hand is going to be occupied later! If you’re new to the idea of hammer-ons and pull-offs we’ll give a brief explanation here, but for an in-depth lesson check out our legato lessons. Here’s the tab for the left hand part:
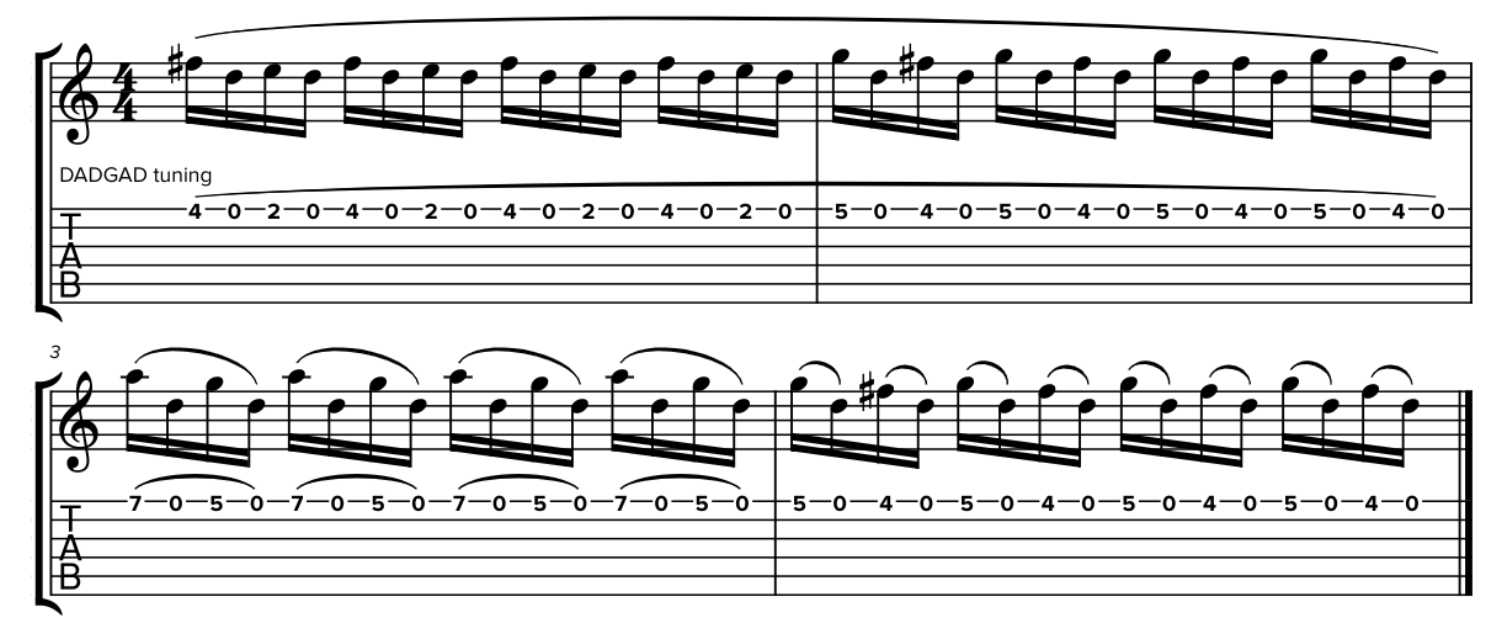
Cam's gone for a pattern that always alternates between a fretted note and an open string - that's intentional! Having the open string on the pull off makes it easier to get the volume into the next hammer on. Notice the notation above too - you’ll see a curved line connecting each note. This means we’re hammering on or pulling off. Usually if you’re going from a low note to a high note you’re hammering on, and high to low is pull off, and that’s exactly what we’re doing here. For the hammer ons literally hammer your fretting finger into the string hard enough to cause the note to ring out, then for the pull off use that same finger to pluck the string as you lift your finger away. This will allow you to keep the string vibrating without using your right hand at all. You could keep this going for as long as you like without picking - the only limit is your left hand stamina! As always - remember to take breaks and if anything hurts stop immediately and reasses your technique.
Right Hand
One you’re happy with the left hand, move on to the right hand part. In terms of number of notes this is a much simpler part. We’re just playing one right hand note for every sixteen left hand notes. In terms of technique however, this is likely to be the tricker part! We’ve got an in depth course on two handed tapping here. That’s a course on Eddie Van Halen style tapping but the basic mechanics are the same! Here’s the right hand tab:
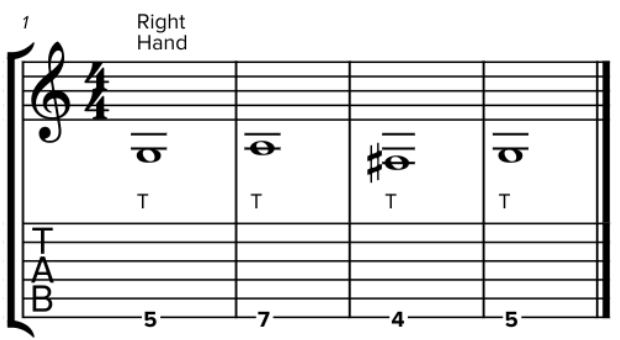
Every note here is tapped with the right hand. Ollie uses his index finger for this, but you can use your middle finger if you’re more comfortable with that. As with hammer ons on the left hand - try to tap hard enough that a note rings out clearly. Also remember not to obstruct the higher strings as you’ll be needing them to ring out next!
All Together
Once you’re happy with the left hand and the right hand separately it’s time to put them together! Here’s the tab:

Keeping time and making sure everything’s loud enough is tough! Remember to start slowly and focus on getting each note to ring out. Once you’ve got the notes ringing out clearly you can gradually increase the tempo. This is a great technique to add some new sounds to your own playing, so give it a go and please send us any videos or recordings you have!