In this mini course James Collins walks us through the art behind neck relief. We take an in depth in how to adjust the neck relief on Gibsons and Fender style guitars, and find out just how important this can be to the overall playability of your guitar.
Summary: What is neck relief?
Neck relief is essentially a measure of how much your neck bends. When you string up your guitar, the tension of the strings pulls the neck upwards. To counteract this pull, the neck has a truss rod in it that essentially pulls the neck back down. When we talk about neck relief we talk about balancing these two opposing forces to get a neck straightness that suits your playing.
RULES: Truss rod rules
Depending on how you play the guitar, and what style you play, you will want differing amounts of neck relief. You can adjust the amount of relief in the neck by adjusting the truss rod. As we get into the next videos, we will show you exactly how to adjust the truss rod, but here are the basic rules to follow when adjusting the truss rod:

Tightening the truss rod makes it pull against the strings with more force and therefore straightens the neck, whilst loosening the truss rod allows the string to pull more therefore curving the neck
Equipment: Getting ready
To get yourself ready for adjusting the truss rod, be sure that you have strung up your guitar with the exact gauge string you want to use, and then tuned it up. You then need to decide how you will be playing the guitar! Have a listen to James' examples within the video and decide if you think you need to play all 22 frets quickly, or just want to strum some big chords. Your answer to these questions will allow you to adjust the neck relief correctly.
Summary: Equipment
To adjust your neck relief, you will need some equipment. These tools are all easy to get hold of and easy to use, so adjusting your own neck relief is still well within the boundaries of something you can do yourself. Here is the gear...
1. Feeler Gauge

The feeler gauge is what you use to measure the distance between the fret and the string, and therefore determine the neck relief. For example, if a 0.014" feeler gauge fits snuggly between the 7th fret and the string (specifically on the 7th fret) then your neck has 0.014" of relief.
2. Allen Key

You will need a set of allen keys for adjusting the truss rod. Some guitars supply you with the correct fitting allen key, but if you don't have that, a standard set of allen keys should give you the size you need.
3. Capo

As James walks you through in the video, you will need a good capo to hold down the strings at the 1st fret, thus allowing you to accurately measure the relief.
Checklist: Adjusting neck relief
Now it's time to give it a try! There are a few steps to follow to get this correct, so we have written a handy checklist for you below:
- 1. Tune the guitar up to pitch
- 2. Capo the 1st fret and fret the last fret (thus giving you a straight edge)
- 3. Take your feeler gauge and measure at the 7th fret until you find a gauge that fits perfectly
- 4. A recommended relief for US strats is 0.008" to 0.012", so any higher or lower than that you will need to adjust (If you are unsure what recommended amount of relief your guitar is, check the manufacturers specs.)
- 5. Take the allen key and adjust the truss rod. Right for tighter (if you need to move from 0.014 to 0.012 for example) and left for looser (if you need to go from 0.006 to 0.008 for example)
- 6. Remember to adjust in increments of two hours on a clock face (for example, 10 to 12)
- 7. Retune your guitar back to pitch and repeat the process until you have the correct relief.
Summary: Equipment
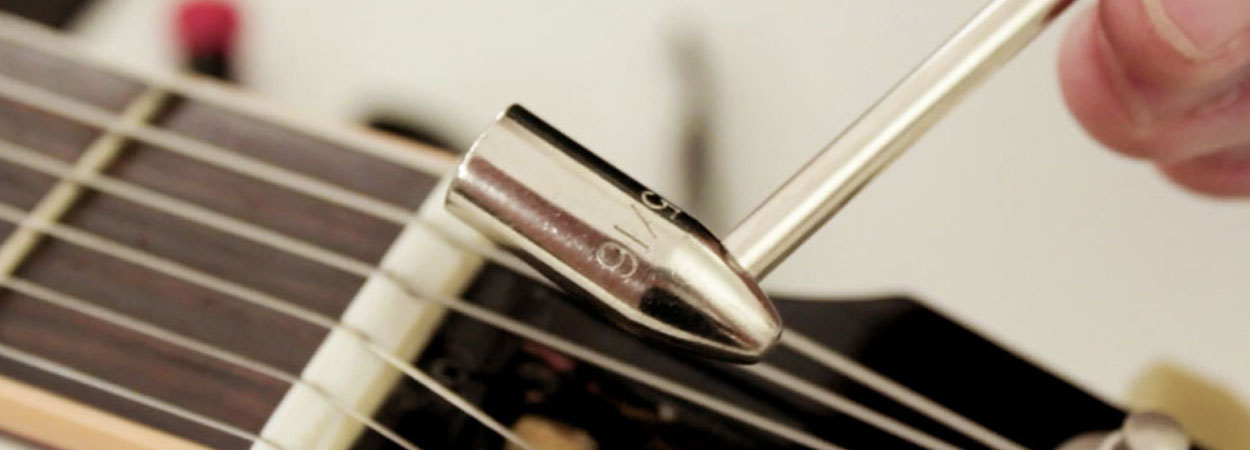
The process of adjusting the relief on a Gibson style neck is almost identical to the Fender. The only difference being the tool you use to adjust the truss rod, and that you have to open up a cover that hides the truss rod. The tool you need instead of the Allen key is a nut wrench, and for Gibson guitars you need a 5/16" which normally comes with the guitar. If they don't, they are easy to find online.
5/16" truss rod nut wrench
Checklist: Adjusting neck relief
Now it's time to give it a try! There are a few steps to follow in order to get this correct, so we have written a handy checklist for you below:
- 1. Tune the guitar up to pitch
- 2. Capo the 1st fret and fret the last fret (thus giving you a straight edge)
- 3. Take your feeler gauge and measure at the 7th fret until you find a gauge that fits perfectly
- 4. A recommended relief for US strats is 0.008" to 0.012", so any higher or lower than that you will need to adjust (If you are unsure what recommended amount of relief your guitar is, check the manufacturers specs.)
- 5. Take the allen key and adjust the truss rod. Right for tighter (if you need to move from 0.014 to 0.012 for example) and left for looser (if you need to go from 0.006 to 0.008 for example)
- 6. Remember to adjust in increments of two hours on a clock face (for example, 10 to 12).
- 7. Retune your guitar back to pitch and repeat the process until you have the correct relief.